Monday, May 28, 2012

Project #2 - Pickup Replacement, Hamer "XT"

For this post I'll be recounting my recent pickup replacement job for my 2-humbucker guitar, made by Hamer, a manufacturer that's been around for almost 40 years. Or, at least it was around - according to Wikipedia, they were recently bought out by Fender, and Hamer's U.S. production guitars have been discontinued. Not sure what this guitar model is actually called, but the headstock says "XT Series", which was their "budget" line of guitars, built in China. I bought it 3 or 4 years ago at Sam Ash sort of on a whim, because it was so inexpensive. I believe the price tag said $249, which itself was a great price, but lucky me, I'd caught it on sale, so I ended up paying what I recall was $179! I wasn't at the store to buy a guitar that day, but since it was so reasonably priced I figured, "why not?"

Hamer "XT" Series Guitar.

These pickups gotta go...

The first thing about this guitar that caught my attention was the translucent black "burst"-type finish, over what appears to be a flame maple top. For a "budget" guitar, this thing looks GREAT. To my eyes, hanging on the wall in the store, it looked like a fairly expensive guitar. After seeing the price tag, I had to at least plug it into an amp and check out how it played.

I remember being particularly impressed by the all-around construction for a guitar at this low price range. The neck feels different than a standard Fender neck; a bit thicker, but still very comfortable in my hand. The action was smooth, and the frets were surprisingly finished quite well. The tuning machines and other hardware were pretty solid, no loose parts at all, as you may occasionally find on the cheaper guitars.

This guitar was just right for me, because I'd been looking for an affordable "Gibson-style" guitar as an alternative to my Fender guitars that I usually play. While I'd love to have a genuine Les Paul or ES-335, they are awfully pricey, more so than even most of Fender's American-made guitars, due to Gibson's fancier designs, overall. I still wrestle with that dilemma; should I or should I not slap down that much money for a Gibson? In the meantime, I'll have fun with my Hamer...

I bought the guitar knowing that the weak link in cheaper electric guitars tends to be the electronics: the switches, the potentiometers, the pickups. When I tested it out in the store, it sounded OK, if not mind-blowing. Again, because of the price, the fact that it felt great to play, and the overall construction of the guitar was very good, I didn't have a huge problem with it not sounding so great. I figured if the pickups or other electronic parts need replacing later on, I can do that myself.

Once I got it home and played it through my amp for a week or so, away from all the racket that goes on in the music stores, I confirmed that better pickups were definitely in this guitar's future. Months after that, I noticed that the bridge pickup really didn't sound very good at all, and buzzed LOUDLY, especially when I touched the metal pickup cover with my fingers. Hard to avoid, because that's exactly what my strumming/picking hand does when it rests against the guitar while playing. That told me there was something funky going on with the wiring, or possibly the pickup itself. The neck, or "rhythm" pickup played with no problems, but the overall sound to my ears was basically "so-so". Not horrible, but not great either. I felt that this guitar could sound much better if I replaced the pickups. Admittedly, the time elapsed between my decision to replace the pickups and actually getting down to doing the job was pretty long! After the bridge pickup started acting up on me, the guitar basically sat in my closet for a long while, until I made time to work on it. Once I started working on my other guitars again, this was the perfect time to get this particular job done, too.

I'd been buying guitar repair supplies and tools from StewMac recently, and they happen to also sell an affordably priced pickup line called Golden Age. They make pickups for both Fender-style and Gibson-style guitars. Since my Hamer was a budget-priced guitar to begin with, I figured I'd give these pickups a try. Most of their pickups are priced at just over half of what one would pay for the more well-known pickup brands, such as Seymour Duncan and Dimarzio. Golden Age seems to focus on reproductions of traditional, classic pickup designs, and have a lot of positive reviews on the StewMac site. Many have opined that they sound excellent for the price, so I felt pretty confident going with them.

Golden Age pickups - "Vintage vibe" at a decent price.

As I said, the Hamer has a 2-humbucker pickup configuration, with 2 volume potentiometers ("pots" for short, 1 per pickup), 1 master tone pot, and a 3-way switch. When I opened up the control panel on the back of the guitar, I found some wiring that was a bit different than what I've seen before. Instead of soldering the pickups' lead wires directly to the volume pots, they had these white plastic connectors, going to this extra wire that was then soldered to the pots. The picture below gives you a better idea of what I'm talking about, since I don't know exactly know what they're called...

Upon closer inspection, I saw that one of the wires from the plastic connectors was very loose, and the more I fiddled with it, it eventually just fell out altogether. There was some kind of small metal thing crimped to the end of the wire, which made the electrical contact with the other side of the connector. Tracing the wire path led me to the ground wire of the bridge pickup - the same one I was having trouble with. Aha! The ground wire's bad connection was the cause of the buzzing when I touched the pickup. I can only assume the factory used those things to wire the guitar to save time in swapping out those cheapo pickups in the event that one failed. So I decided to get rid of those plastic connector things, and just wire up everything the conventional way, which wasn't too much hassle, being that I was expecting to do that anyway. I could even use the same wire that was already there, so no parts or supplies were really needed to do this job, other than the new pickups, of course.

The control cavity. The white plastic connectors in the wiring are not normally used in guitar electronics...
...and here's the reason why - a bad connection.

The pickup replacement was pretty straightforward. Once I got the old pickups out of there, I installed the new pickups into the plastic cream-colored mounting rings using the height adjustment screws and springs. This is usually the tricky part, because it's all too easy to slip and lose hold of a spring as you try to compress it over the screw that mounts into the pickup, and then *BOING*, the spring goes flying and disappears into the Land of Lost Stuff...! I've struggled with non-"behaving" pickup height springs many times in the past. The folks at StewMac have a clever solution for that as well - the Humbucker Helpers. These are stainless steel clips that temporarily hold the whole assembly of the mounting ring, the pickup, 2 screws, and the springs all together until you have the screws securely mounted into the pickup, with springs attached. Then simply pull the clip away, and everything stays put as you need it to. Very cool! The page link shows pictures of them in use - I forgot to take one myself with them on.

Doing things the hard way - removing the old pickups with strings still on.

New Golden Age pickups ready to go. Mounting rings and height adjustment screws installed with the assistance of the "Humbucker Helpers".

Next was to get each assembly into their respective pickup cavities. Not too challenging, except that I went ahead with attempting this installation without removing the strings, as I didn't have a new set of strings to install at the time. It wasn't too difficult - I just had to take extra care not to scratch the guitar's finish while squeezing the pickups underneath the loose strings, and into the cavities. Happy to say that it worked out without incident.

On this guitar, there is a small channel routed into the body of the guitar where you thread the lead wires of the neck pickup (the top one) through, then into the control cavity in the back, where the wires would be soldered to the volume pots. Since the control cavity is fairly tight, I needed to undo the mounting nuts and lift the pots out of the guitar. To give the pots some stability while I'm soldering, I used a small piece of cardboard with holes poked into them, and inserted the shaft of the pots into the holes. That way, I had better access to the connections I needed to get at with my soldering iron. I also used a small cloth to prevent the pots from scratching the back of the guitar body while I'm working.

Removing the volume pots.

Threading the pickup leads thru the channel, to the control cavity.
Soldering the leads to the volume pots, with cardboard as support.

With everything soldered, I installed each pot back where they belonged, and used some masking tape to gather up the longer lengths of wire and make it somewhat neater inside the cavity. The tape replaced the plastic ties they had on the wires before I started. Fortunately I didn't have to make any solder connections to the pickup selector switch, so at that point the job was done, save for screwing the cover back onto the control cavity. Upon first testing, I did have a weird situation where the sound of one of the pickups was cutting out intermittently. After opening everything up again, I inspected the solder joints I just made, which looked fine to me; I didn't see a need to re-do them. I then shrugged, re-installed the pots in the cavity, closed it up, plugged in again, and this time there were no problems with the pickups. Perhaps a wire was shorting out against something inside? I'm still not sure what happened there, but all works fine now; I haven't had any problems with the sound cutting out after re-sitting everything into place.

Pots back in the guitar, with wires taped up neatly.

Everything re-assembled. Success!

I definitely hear a much improved sound on this guitar with the new pickups. They have a smooth, clean sound. I can also coax out warmer, jazzy/bluesy tones as well, especially if I roll down the tone knob a bit. All my testing is done through a small Fender solid-state "Bronco" practice amp, on mostly clean settings - the "distorted" sounds for this little amp are fairly useless (meaning bad). I still need to check it out playing through my somewhat larger Fender "Blues Jr." amp, trying some dirtier, more "authentic" tube tones. That said, I'm happy with how it sounds now, finally.

All the problems with buzzing and noise are gone. This is one quiet guitar - hands down the quietest one I own now, even with all the sheilding work I've done on my Fenders. After all the "wrestling" I've done over the years with the buzzing and humming of my single-coil guitars, this is like a breath of fresh air! I'm looking forward to recording with this guitar in the future.

As I mentioned in the last post, since I'm quite satisfied with these Golden Age pickups, I plan on also getting a single-coil set to install in my Fender Strat. When that happens, I'll definitely write up a post about installing those pickups as well.  Until next time...

Saturday, May 12, 2012

Project #1 - Reviving My Fender Stratocaster

I'm back once again... Looking at the blog, it's been quite a while since I've posted. My last post was in January, and here we are, already in May! Weird, how time flies... I should have more stuff to post in the coming weeks or months. I'm on a sort of hiatus from recording at the moment, so I decided to work on my guitar projects in the meantime. I currently have 3 electric guitars and 2 bass guitars, and they all need work of some sort or another. Generally speaking, the older the instrument is, the more work is needed to be done on them.

I didn't plan to start working on them now, but after doing the work on my brother's bass guitar recently (basically re-wiring the whole thing), I suppose I got the bug to work on my own instruments again. The wiring job on my brother's bass was pretty challenging for my current level of expertise. However, I did gain some good practical knowledge and experience from the job, and will now have a much better idea of what I'm doing when I work on my own guitars. Unfortunately, I didn't think to take pictures of the bass job...

1994 Fender Stratocaster
The first guitar I decided to work on was the one that's been neglected the longest, my black Fender Stratocaster. This is a "made-in-Mexico" model (which Fender calls the "Standard" Stratocaster) that I bought back in 1994; the first brand-new guitar I ever purchased. In fact, it was the only electric guitar that I owned for many years. Once I got my "American Standard" Fender Telecaster in 2007, the Strat was more or less put on retirement status. But I've been missing my old Strat lately, so I felt it was time to start getting it back into playing shape again. Looking at it now, I see all the years of playing and general knocking around through the various nicks, dents and scratches. The frets are especially worn; practically ground down to nubs, with deep vertical grooves in them from the friction against the strings; they're supposed to be smooth from end to end. I definitely played the heck out of this guitar! Eventually I plan to take it to a professional to get new frets installed. In its current shape, it's never going to be 100% playable. With the worn-out frets, it's too difficult to play certain chords without fret buzzing.

These frets are shot.
For now, the focus will be on what jobs I can do myself, which is install copper foil shielding tape in the pickup cavity of the guitar body to help reduce hum and noise, which I learned all about last year with the Tele. I also re-installed the original single-coil pickup in the bridge position. It was replaced with a Seymour Duncan JB humbucker many years ago. I changed out the pickup to have access to more of a "Rock" sound, while keeping the brighter, cleaner-sounding single-coils in the middle and neck positions, since I only had one electric guitar at the time. That was the only real modification done on this guitar - everything else is basically stock as I purchased it.

My pickup installation "hack" job, done years ago.
This time around, the shielding work on the Strat went way smoother than with the Tele. It's still time-consuming work, but I at least had more of a clue on how to go about it. The best part was that I didn't slice open any of my fingers with the copper foil tape like last time...

Pickup and control cavity, before copper foil tape application...

...and after.
Once the shielding was done, it was on to de-soldering the humbucker pickup and re-installing the single-coil, as well as wiring up a new volume potentiometer (tech name for the "knob"). The old one still works, but it's worn, with audible static-y sounds coming through the amp when you turn the volume knob. They have electronics contact cleaners available that would fix that, but I've never purchased any as of yet. Besides, new pots are fairly cheap. I've found they cost no more than between $5 and $8 a piece. In many cases, less than that, depending on the brand and where you purchase. Plus, I like to practice to improve my soldering technique. I first learned how to solder way back in junior high school, but apparently my technique had been sorely lacking! Thanks to DVDs and YouTube videos, I've recently learned how to correctly solder guitar electronics just in the past few weeks. I'm not sure I'd call my techniques "correct" just yet, but they have definitely improved.

Pickguard turned over to show pickup & control wiring
To insure I wouldn't screw something up, I downloaded a wiring diagram from Seymour Duncan's website. Their free wiring diagram page has PDF files of just about every conceivable pickup configuration - a great resource! There are other free sources of wiring diagrams online, but I find Seymour Duncan's the easiest to read and understand. With my diagram and my trusty tools in hand, this procedure also went pretty smoothly. Oh, and because the pickguard has a large hole cut out to allow the larger humbucker pickup to fit, installing the original pickups and controls into a new pickguard was also part of this job.  When I was installing the humbucker way back then, I wonder why I didn't just buy a new pickguard, instead of "hacking" a larger hole into the original? Youthful impatience? Didn't want to spend the extra money? Who knows? That was nearly 20 years ago...!

Electronics transferred to the new pickguard (note aluminum shielding foil).
The end result, back to its original look (and sound).

Once the job was finished, I installed new strings on the guitar, and everything worked fine. My only gripe is that I'm not getting the amount of reduction in hum and noise that I thought I would with the shielding tape job done; pretty much the same result as when I did the same job on the Tele. Is there something I'm missing? I recently read some articles online about other ways to shield your guitar from electrical interference, including wiring shielded single conductor wire on the output jack, which I did on my brother's bass, and it seemed to help reduce noise quite a bit (in addition to shielding the pickup cavity on his bass as well). So perhaps that's the "missing link". I didn't re-wire the output jack on the Strat, but I plan to as soon as I buy more of that type of wire, and see if that helps reduce more of the hum.

Another shielding technique I read about is to wrap a length of copper foil tape around the actual pickup coils, then solder a ground wire from the tape to the bottom bobbin of the pickup (where the main pickup coil wire is attached). I'm not sure I want to get into that level of soldering, because I read that it's delicate work where you can easily ruin the pickup if you mess up. What I'm thinking of doing instead is buying a new set of Golden Age Strat pickups I've been reading about, from StewMac. They are modestly priced compared to other brands, and they come pre-installed with the shielding I just mentioned. I recently bought a pair of Golden Age humbucker pickups for another guitar of mine, and plan to install those very soon. That will be the subject of my next post. If those pickups are to my liking, I'll most likely go ahead and buy the Strat pickups too. More stuff coming soon...

FYI, it is not at all my intention for this post to be one big ad for StewMac. I certainly don't work for them (haha), but I personally believe them to be a good source for useful (and free) information, as well as buying parts and supplies you need. I figure if you can find everything you need in one place, why not take advantage? But that certainly doesn't mean you can't shop around, which I do as well. Just thought I'd put that out there.

Some helpful articles on guitar electronics:

http://www.stewmac.com/tradesecrets/promo/ts0052_shielding

http://www.guitarnuts.com/wiring/menu.php (Good info on this site, but it seems to be an older-type site, loaded with annoying pop-up windows when you click page links. You have been warned...)

Sunday, January 22, 2012

Finally.

Happy 2012 to everyone... It sure has been a while since I've posted last, but I certainly have something of interest to share today...

After many months of ups & downs, technical issues, setbacks, do-overs and everything else you can think of, I finally have some music to share with you. I have joined Soundcloud to post my music online. There are currently 3 tracks posted, and more in the works. For those who have been waiting - thanks for your patience. Hope you enjoy...

Demos - 2012 by harvard_exp

Saturday, November 5, 2011

In The Mix...

Whew... It's been a busy week for me. Making my best efforts to finish recordings for 3 of my tunes. Not an easy task with a 9-to-5 to contend with, but we do what we must...! I finally finished recording all parts for the songs, and as of last weekend, I am officially in the mixing stage, working every evening when I get home from my job.

Mixing is a crucial part of the recording process that I'm kind of embarrassed to admit I've been struggling with for 15 years now. But for those that have heard my older recordings, it should come as no surprise... The quality of my mixes has always been on the amateur side of town, and that's putting it nicely. It takes a trained and tuned ear, and some degree of skill to create a mix that bears repeated listening. Otherwise, it simply leaves no doubt that you record at home, haha! I feel that if people have to ask if you record in your bedroom or in a "real" studio, then you know you're on to something. That's where I'd like to be someday. Fortunately, I think I made another step toward getting there last week...

Here I'll give a hopefully basic and low-tech rundown of the recording process for those who aren't knowledgeable about how it works. Generally, you start by recording your separate parts that will comprise your musical piece. That can consist of instruments, vocals, sound effects or anything you wish to record as part of your piece. In most cases, each individual instrument or vocal part is given its own separate track. Depending on your equipment, each track can usually be recorded one at a time as overdubs, or all parts can be recorded together live, in the case of recording a band, for example. This process is known as multitrack recording.

Once all parts are recorded, you begin the mixing process, whereby you adjust levels of each track in relation to the others, as well as add EQ and any audio effects that will enhance the overall sound. When you have the mix sounding the way you want, you would then make a 2-track stereo master of your mix, which then allows you to share your music with others, on CD or online. More often than not these days, one is working digitally, so the master itself will consist of an audio file, be it WAV, AIFF, or MP3.

The mixing process can also be referred to a mixdown, because you are mixing several audio tracks (24, 48 or more are not unheard of), down to 2 stereo tracks (1 track for the right speaker, 1 track for the left). Thanks to Surround sound, one also has the option to mix down to 6 or 8 separate tracks, but that's mainly used for those mixing sound for video or feature films. I'm not part of that world, nor do I have a desire to be, at least for now. I have enough trouble mixing down to 2 tracks!

Mixing audio is time consuming, especially if you don't have a clear mental picture of how you want the music to sound. Even the most experienced professional mix engineers will take several hours, even a whole day, to get what he or she is looking for in a final mix, doing multiple versions of the mix for the client to choose from. For those less experienced like myself, the process usually takes several DAYS.

The past week or so has felt like a mission of sorts. This mission has been to tackle long standing issues with mixing my own music. The question at hand was, "What will it take to improve my mixes?" It certainly isn't a question of not having the proper equipment. The current era of technology ensures that high-quality home recordings can be made by nearly anyone with an interest to do so. Like many others out there that record their own music at home, I use multitrack recording software on a laptop, along with a recording interface. That's all I need to do the job, so again, the equipment is definitely not the problem.

For monitoring the mix playback, I use 5-inch stereo monitor speakers. Research, time, and experience have taught me that a good pair of reference monitor speakers with a flat frequency response are essential for creating quality mixes that will translate well to other stereo systems' speakers. By translate, I mean that the music will sound "right" on different types of systems - home stereos, boomboxes, car stereos, iPod earbuds, what have you.

A mixer's best friend (besides their ears).

I'd say that the most important aspect of creating a mix that at least approaches a "professional" level, would be the aspect of clarity. In the past, I'd do a mix that sounded OK on my studio monitors. Next, I'd burn the mix to CD, play it back on another stereo system, and it would sound almost completely different. I mean different in a BAD way. In particular, judging the right amount of bass in a mix was where I invariably had the most trouble. Played on a different system, my mixes always sounded too muffled and boomy, due to way too much low-end. Reducing the low end would often leave me with a mix that sounded thin. It can take a long time to get that right, just starting out. The point being, hearing less than stellar results after long hours of work can be frustrating and discouraging, to say the least.

You typically can hear all the distinct elements of a piece of music in a mix that has clarity. The different instruments and any vocals should not appear to be fighting for the same sonic space, obscuring one another. Rather, each element should have its own space, yet all parts blend together well to form a cohesive whole. In the world of stereo mixing, you often have many different parts that you need to squeeze into the same sonic space between only two speakers!

When those parts share common frequencies, that makes the goal of clarity all the more challenging. On most multi-channel audio mixers (hardware or software equivalent), you will have (at least) controls for adjusting the level (volume) of each individual track, panning (adjusts the track within the stereo spectrum from left to right), and EQ controls. Hands down, the most important things to adjust and experiment with in achieving a good mix. Once those elements are under control, you may have access to audio effects such as reverb and delay that give the audio a sense of space in your track. Compression and limiting, which control dynamics, are equally important. There are many more effects available to utilize, but it's really beyond the scope of this post to go any further into it. I've probably gone too far out there as it is! Hope you're still with me...

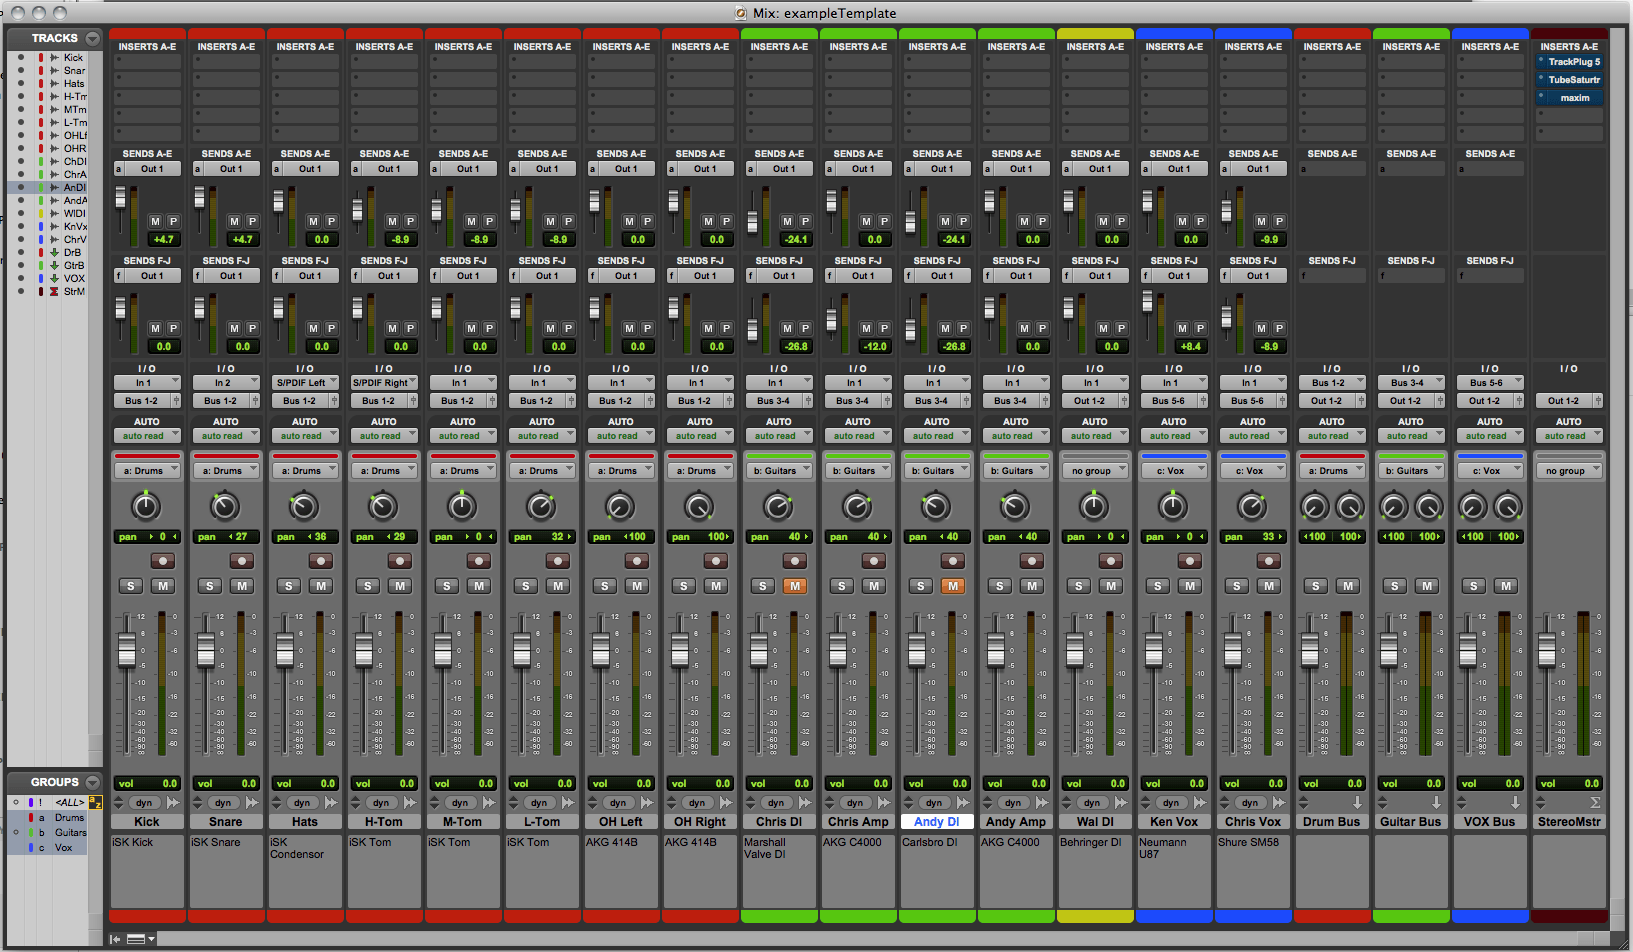
Virtual mixer screen in Pro Tools, my recording software of choice.

Which brings me back to my main point. When I have access to all these tools to create my mix, it really comes down to the 2 most important tools of all: my speakers, and my ears. You can have the best equipment in the world, but it won't matter a bit if you have not tuned or trained your ears for this kind of work. Training your ear to make good mixes takes practice, making as many mixes as you need to before you get it right.

That's the lesson I learned this past week, for as many hours as I could squeeze in before having to go to bed and return to work the next day. Working on the first of the three songs, I'm happy to say that I've finally completed a mix that I'm pretty darn satisfied with! Certainly all my past experience helped me get to this point, especially remembering what NOT to do! However, I believe it was increasing my focus and persistence that helped me finally come across to the other side and produce a mix that I could live with. This is not to say that I now know all there is to know about mixing - I still have much to learn and improve on. But I believe that it will make the next mix project that much easier to get it the result I want. That next project is coming up soon, as in next week, if not this weekend! I have two more songs to mix, then I'll finally be able to post them online and share them with you folks out there. No concrete time frame as to when that will be; as I like to say, hopefully sooner rather than later! Till next time...

A book on audio mixing that's provided me with a lot of good info:

The Mixing Engineer's Handbook

Saturday, October 8, 2011

R.I.P.

For the tools that made tasks in my everyday life much easier to accomplish...

That helped me accomplish things I previously thought were beyond the reach of everyday people...

For the tools I was at times unaware of wanting, but now would not want to do without...

Thank you.


Monday, September 5, 2011

Recording Piano

Back once again, folks. Today, I thought I would share my recent experience in recording some live piano for the first time, for a song I'm working on. "Live", as opposed to simulated, or "virtual" piano. Why is this special, you may ask? Well, because of the degree to which digital technology has advanced, today you can have virtual versions of just about any type of instrument you can think of in the form of software, available at the click of your computer mouse, and a MIDI keyboard or other device, to play the sounds.

One of the most common and most useful virtual instrument sounds is the emulation of an acoustic piano. Not everyone has the means to purchase a real piano, or the physical space necessary to house one! Not to mention forgiving neighbors, accommodating the noise factor... For that reason, virtual pianos are great to work with, especially with the level of realism being achieved, and continues to improve. The downside is what gets lost when playing virtual piano, and the most important element lost is referred to by some players as "feel". The relationship of the hands with the keys, and the response of the instrument are important factors to a piano player. Playing sampled piano sounds from a MIDI keyboard with plastic keys will probably sound perfectly acceptable for the listener, but it will never feel like a real piano to the musician. It is simply one of those things a modern keyboard player learns to live with particularly when playing live, but is often the case when recording as well, especially at home.

The piano, the way it usually looks
So when the opportunity to record with a real piano came about, I jumped at it! The song I'm working on is mostly based around an acoustic guitar. However, I felt that the song would benefit from a piano part in the middle section (a "solo", of sorts). This was great timing, as my recording equipment had all been recently upgraded and tailored to be more mobile. The piano (an *old* Kawai upright) is located in the den of my parents' house. My mobile equipment allowed me to go to them and record with relative ease. The only thing is that I've never recorded one before! So (like everything else that comes up in my life these days), I did some online research to at least get pointed in the right direction. I found a few articles that gave me some ideas on mic placement, to get the best possible sound.

Setting up

I also wanted to have the right type of microphones for the job. However, when it comes to mics, there are usually several options on what to choose. I decided to go with a pair of Samson CO2 condenser mics. They are small diaphragm mics which, my research told me, tend to capture acoustic instruments quite well, particularly the detail in the upper frequency ranges. Since this recording session was a bit experimental in nature for me, I wasn't prepared to spend a whole lot of money. Fortunately, these mics came as a matched pair, with case and mic stand adapters for $119. A pretty good deal, being that mics of this type typically cost at least twice as much, for a single mic! I haven't completed the track yet, so I don't have a final, concrete opinion on the quality of the mics, but based on what I heard from the playback of what was recorded, the sound was decent enough for me. I'm pretty confident that it will be sufficient for what I need on the song.

The piano is not in regular use by those who live in the house, so the furniture in the den is arranged near the piano pretty tightly, as if it were another piece of furniture itself (sorry Mom & Dad). Thus, a little prep work had to be done before I could get down to business. That consisted of clearing away a loveseat and a coffee table to make some room, and setting up some "TV trays" to set my equipment on. Fortunately, an electrical outlet with a power strip was close at hand to plug in my equipment. I also had to do a quick and dirty repair on the sustain pedal of the piano, which was loose. A rattling sound every time I pressed down on the pedal would pretty much ruin anything I tried to record. Some painter's masking tape wrapped around the pedal did the trick quite nicely for muting the offending noise. The pedal also squeaks a bit, but I didn't have time to figure out where it was coming from, so I did some "tweaking" to my playing technique and used it only when necessary. If I get the chance to record there again, that will be next on my list of fixes.

The recording equipment consisted of my laptop (a 15" Apple MacBook Pro), a Digidesign Mbox 2 USB audio interface, an external FireWire hard drive, and the aforementioned Samson condenser mics. As far as DAW software, I use Pro Tools LE 8. They're up to version 9 now, but I haven't gotten around to upgrading yet.

The recording equipment


Ready to record

Concerning mic placement, I set them over the top of the piano with the lid open, strings and hammers exposed. As the pictures illustrate, one mic covered the lower end of the instrument, the other covering the upper end. The mics were slightly tilted to attempt a good blend of both ends of the piano range. Each mic was recorded to its own separate audio track in Pro Tools. The two tracks should give a nice stereo image when it comes time to mix the song.

Once set up, the recording process was pretty much the same as when I record at home - I do multiple takes, and at some point assess how things are going. In a perfect world, I'd be able to perform the whole part in a single take. In almost all cases, it doesn't work out that way, at least for me. So, I record enough takes until I feel I have enough to piece together an entire section that I'll be satisfied with. In other words, I take pieces that I feel are good from the separate takes and edit them together to create a "master" take. It may seem like cheating to some, but this technique has been used by professionals for decades (yes, even before digital recording), so I don't feel so bad, haha.
Mics pointed toward the inside of the piano

Once I did my takes for the middle section, I decided that I should record some chords in the final chorus of the song. I'm not sure that I'll use it in the final version, but I figured it couldn't hurt to record it, since I was all set up to do so. Another round of takes for that part, and I was done. All that remained was packing up the equipment, and putting the room back the way I found it - don't want my folks regretting having me over to record, because of the mess I made. I may want to come back and record again someday!

All said and done, it was a pretty enjoyable experience, and stress-free. First, because I was only recording a couple of short parts. Secondly (and most importantly), because my parents were kind and gracious hosts, allowing me to record for an afternoon in their home. Thanks Mom & Dad!

Sunday, August 7, 2011

I Played Guitar This Weekend

for the first time in a month...

and DAMN my fingers hurt!

Time to get my callouses back.  :-b