Saturday, November 5, 2011

In The Mix...

Whew... It's been a busy week for me. Making my best efforts to finish recordings for 3 of my tunes. Not an easy task with a 9-to-5 to contend with, but we do what we must...! I finally finished recording all parts for the songs, and as of last weekend, I am officially in the mixing stage, working every evening when I get home from my job.

Mixing is a crucial part of the recording process that I'm kind of embarrassed to admit I've been struggling with for 15 years now. But for those that have heard my older recordings, it should come as no surprise... The quality of my mixes has always been on the amateur side of town, and that's putting it nicely. It takes a trained and tuned ear, and some degree of skill to create a mix that bears repeated listening. Otherwise, it simply leaves no doubt that you record at home, haha! I feel that if people have to ask if you record in your bedroom or in a "real" studio, then you know you're on to something. That's where I'd like to be someday. Fortunately, I think I made another step toward getting there last week...

Here I'll give a hopefully basic and low-tech rundown of the recording process for those who aren't knowledgeable about how it works. Generally, you start by recording your separate parts that will comprise your musical piece. That can consist of instruments, vocals, sound effects or anything you wish to record as part of your piece. In most cases, each individual instrument or vocal part is given its own separate track. Depending on your equipment, each track can usually be recorded one at a time as overdubs, or all parts can be recorded together live, in the case of recording a band, for example. This process is known as multitrack recording.

Once all parts are recorded, you begin the mixing process, whereby you adjust levels of each track in relation to the others, as well as add EQ and any audio effects that will enhance the overall sound. When you have the mix sounding the way you want, you would then make a 2-track stereo master of your mix, which then allows you to share your music with others, on CD or online. More often than not these days, one is working digitally, so the master itself will consist of an audio file, be it WAV, AIFF, or MP3.

The mixing process can also be referred to a mixdown, because you are mixing several audio tracks (24, 48 or more are not unheard of), down to 2 stereo tracks (1 track for the right speaker, 1 track for the left). Thanks to Surround sound, one also has the option to mix down to 6 or 8 separate tracks, but that's mainly used for those mixing sound for video or feature films. I'm not part of that world, nor do I have a desire to be, at least for now. I have enough trouble mixing down to 2 tracks!

Mixing audio is time consuming, especially if you don't have a clear mental picture of how you want the music to sound. Even the most experienced professional mix engineers will take several hours, even a whole day, to get what he or she is looking for in a final mix, doing multiple versions of the mix for the client to choose from. For those less experienced like myself, the process usually takes several DAYS.

The past week or so has felt like a mission of sorts. This mission has been to tackle long standing issues with mixing my own music. The question at hand was, "What will it take to improve my mixes?" It certainly isn't a question of not having the proper equipment. The current era of technology ensures that high-quality home recordings can be made by nearly anyone with an interest to do so. Like many others out there that record their own music at home, I use multitrack recording software on a laptop, along with a recording interface. That's all I need to do the job, so again, the equipment is definitely not the problem.

For monitoring the mix playback, I use 5-inch stereo monitor speakers. Research, time, and experience have taught me that a good pair of reference monitor speakers with a flat frequency response are essential for creating quality mixes that will translate well to other stereo systems' speakers. By translate, I mean that the music will sound "right" on different types of systems - home stereos, boomboxes, car stereos, iPod earbuds, what have you.

A mixer's best friend (besides their ears).

I'd say that the most important aspect of creating a mix that at least approaches a "professional" level, would be the aspect of clarity. In the past, I'd do a mix that sounded OK on my studio monitors. Next, I'd burn the mix to CD, play it back on another stereo system, and it would sound almost completely different. I mean different in a BAD way. In particular, judging the right amount of bass in a mix was where I invariably had the most trouble. Played on a different system, my mixes always sounded too muffled and boomy, due to way too much low-end. Reducing the low end would often leave me with a mix that sounded thin. It can take a long time to get that right, just starting out. The point being, hearing less than stellar results after long hours of work can be frustrating and discouraging, to say the least.

You typically can hear all the distinct elements of a piece of music in a mix that has clarity. The different instruments and any vocals should not appear to be fighting for the same sonic space, obscuring one another. Rather, each element should have its own space, yet all parts blend together well to form a cohesive whole. In the world of stereo mixing, you often have many different parts that you need to squeeze into the same sonic space between only two speakers!

When those parts share common frequencies, that makes the goal of clarity all the more challenging. On most multi-channel audio mixers (hardware or software equivalent), you will have (at least) controls for adjusting the level (volume) of each individual track, panning (adjusts the track within the stereo spectrum from left to right), and EQ controls. Hands down, the most important things to adjust and experiment with in achieving a good mix. Once those elements are under control, you may have access to audio effects such as reverb and delay that give the audio a sense of space in your track. Compression and limiting, which control dynamics, are equally important. There are many more effects available to utilize, but it's really beyond the scope of this post to go any further into it. I've probably gone too far out there as it is! Hope you're still with me...
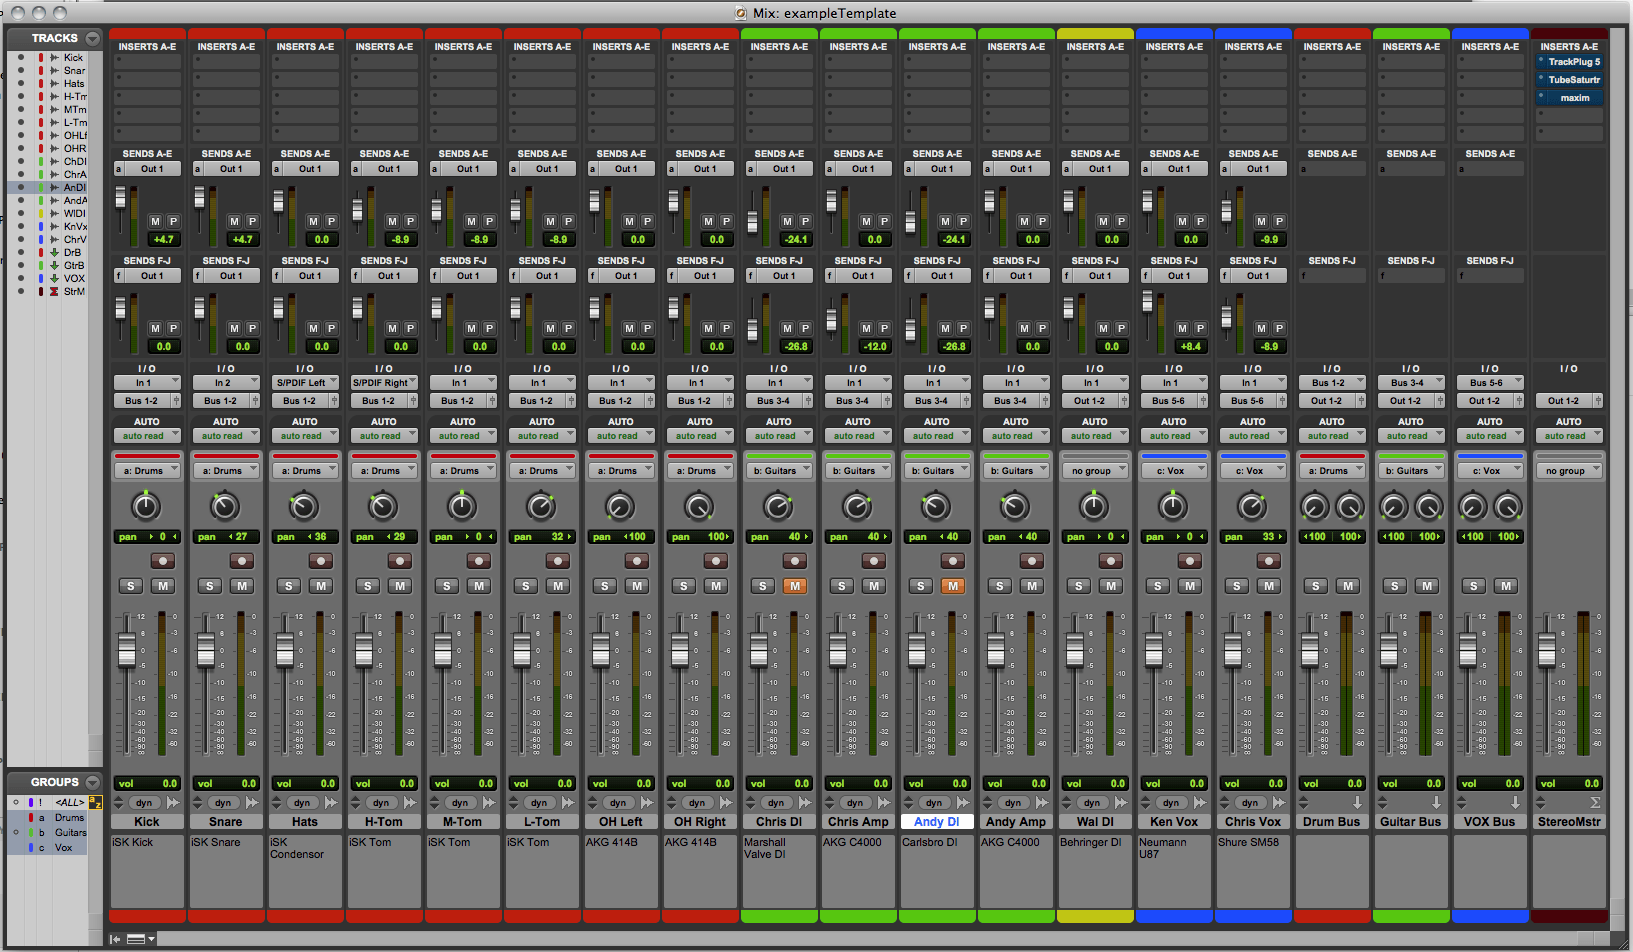
Virtual mixer screen in Pro Tools, my recording software of choice.

Which brings me back to my main point. When I have access to all these tools to create my mix, it really comes down to the 2 most important tools of all: my speakers, and my ears. You can have the best equipment in the world, but it won't matter a bit if you have not tuned or trained your ears for this kind of work. Training your ear to make good mixes takes practice, making as many mixes as you need to before you get it right.

That's the lesson I learned this past week, for as many hours as I could squeeze in before having to go to bed and return to work the next day. Working on the first of the three songs, I'm happy to say that I've finally completed a mix that I'm pretty darn satisfied with! Certainly all my past experience helped me get to this point, especially remembering what NOT to do! However, I believe it was increasing my focus and persistence that helped me finally come across to the other side and produce a mix that I could live with. This is not to say that I now know all there is to know about mixing - I still have much to learn and improve on. But I believe that it will make the next mix project that much easier to get it the result I want. That next project is coming up soon, as in next week, if not this weekend! I have two more songs to mix, then I'll finally be able to post them online and share them with you folks out there. No concrete time frame as to when that will be; as I like to say, hopefully sooner rather than later! Till next time...

A book on audio mixing that's provided me with a lot of good info:

The Mixing Engineer's Handbook

Saturday, October 8, 2011

R.I.P.

For the tools that made tasks in my everyday life much easier to accomplish...

That helped me accomplish things I previously thought were beyond the reach of everyday people...

For the tools I was at times unaware of wanting, but now would not want to do without...

Thank you.


Monday, September 5, 2011

Recording Piano

Back once again, folks. Today, I thought I would share my recent experience in recording some live piano for the first time, for a song I'm working on. "Live", as opposed to simulated, or "virtual" piano. Why is this special, you may ask? Well, because of the degree to which digital technology has advanced, today you can have virtual versions of just about any type of instrument you can think of in the form of software, available at the click of your computer mouse, and a MIDI keyboard or other device, to play the sounds.

One of the most common and most useful virtual instrument sounds is the emulation of an acoustic piano. Not everyone has the means to purchase a real piano, or the physical space necessary to house one! Not to mention forgiving neighbors, accommodating the noise factor... For that reason, virtual pianos are great to work with, especially with the level of realism being achieved, and continues to improve. The downside is what gets lost when playing virtual piano, and the most important element lost is referred to by some players as "feel". The relationship of the hands with the keys, and the response of the instrument are important factors to a piano player. Playing sampled piano sounds from a MIDI keyboard with plastic keys will probably sound perfectly acceptable for the listener, but it will never feel like a real piano to the musician. It is simply one of those things a modern keyboard player learns to live with particularly when playing live, but is often the case when recording as well, especially at home.

The piano, the way it usually looks
So when the opportunity to record with a real piano came about, I jumped at it! The song I'm working on is mostly based around an acoustic guitar. However, I felt that the song would benefit from a piano part in the middle section (a "solo", of sorts). This was great timing, as my recording equipment had all been recently upgraded and tailored to be more mobile. The piano (an *old* Kawai upright) is located in the den of my parents' house. My mobile equipment allowed me to go to them and record with relative ease. The only thing is that I've never recorded one before! So (like everything else that comes up in my life these days), I did some online research to at least get pointed in the right direction. I found a few articles that gave me some ideas on mic placement, to get the best possible sound.

Setting up

I also wanted to have the right type of microphones for the job. However, when it comes to mics, there are usually several options on what to choose. I decided to go with a pair of Samson CO2 condenser mics. They are small diaphragm mics which, my research told me, tend to capture acoustic instruments quite well, particularly the detail in the upper frequency ranges. Since this recording session was a bit experimental in nature for me, I wasn't prepared to spend a whole lot of money. Fortunately, these mics came as a matched pair, with case and mic stand adapters for $119. A pretty good deal, being that mics of this type typically cost at least twice as much, for a single mic! I haven't completed the track yet, so I don't have a final, concrete opinion on the quality of the mics, but based on what I heard from the playback of what was recorded, the sound was decent enough for me. I'm pretty confident that it will be sufficient for what I need on the song.

The piano is not in regular use by those who live in the house, so the furniture in the den is arranged near the piano pretty tightly, as if it were another piece of furniture itself (sorry Mom & Dad). Thus, a little prep work had to be done before I could get down to business. That consisted of clearing away a loveseat and a coffee table to make some room, and setting up some "TV trays" to set my equipment on. Fortunately, an electrical outlet with a power strip was close at hand to plug in my equipment. I also had to do a quick and dirty repair on the sustain pedal of the piano, which was loose. A rattling sound every time I pressed down on the pedal would pretty much ruin anything I tried to record. Some painter's masking tape wrapped around the pedal did the trick quite nicely for muting the offending noise. The pedal also squeaks a bit, but I didn't have time to figure out where it was coming from, so I did some "tweaking" to my playing technique and used it only when necessary. If I get the chance to record there again, that will be next on my list of fixes.

The recording equipment consisted of my laptop (a 15" Apple MacBook Pro), a Digidesign Mbox 2 USB audio interface, an external FireWire hard drive, and the aforementioned Samson condenser mics. As far as DAW software, I use Pro Tools LE 8. They're up to version 9 now, but I haven't gotten around to upgrading yet.

The recording equipment


Ready to record

Concerning mic placement, I set them over the top of the piano with the lid open, strings and hammers exposed. As the pictures illustrate, one mic covered the lower end of the instrument, the other covering the upper end. The mics were slightly tilted to attempt a good blend of both ends of the piano range. Each mic was recorded to its own separate audio track in Pro Tools. The two tracks should give a nice stereo image when it comes time to mix the song.

Once set up, the recording process was pretty much the same as when I record at home - I do multiple takes, and at some point assess how things are going. In a perfect world, I'd be able to perform the whole part in a single take. In almost all cases, it doesn't work out that way, at least for me. So, I record enough takes until I feel I have enough to piece together an entire section that I'll be satisfied with. In other words, I take pieces that I feel are good from the separate takes and edit them together to create a "master" take. It may seem like cheating to some, but this technique has been used by professionals for decades (yes, even before digital recording), so I don't feel so bad, haha.
Mics pointed toward the inside of the piano

Once I did my takes for the middle section, I decided that I should record some chords in the final chorus of the song. I'm not sure that I'll use it in the final version, but I figured it couldn't hurt to record it, since I was all set up to do so. Another round of takes for that part, and I was done. All that remained was packing up the equipment, and putting the room back the way I found it - don't want my folks regretting having me over to record, because of the mess I made. I may want to come back and record again someday!

All said and done, it was a pretty enjoyable experience, and stress-free. First, because I was only recording a couple of short parts. Secondly (and most importantly), because my parents were kind and gracious hosts, allowing me to record for an afternoon in their home. Thanks Mom & Dad!

Sunday, August 7, 2011

I Played Guitar This Weekend

for the first time in a month...

and DAMN my fingers hurt!

Time to get my callouses back.  :-b

Sunday, July 3, 2011

iPod Resurrection with CompactFlash, Part 2

It's alive!!! Muahahaha....

Well folks, the iPod project is finally complete, and I'm happy to report that the operation was a success! For those who need reminding, the hard drive inside my old iPod (bought in 2006) died earlier this year, and I got the idea from some web articles to replace it with a 32GB CompactFlash card, with the help of an adapter.

But first a relatively brief run down on what took so long to get it done... A few things, really: First, once I initially opened up the iPod, I figured out that I'd purchased the wrong type of adapter to install the CF card with. That turned out to be an easy fix, as I contacted the Amazon merchant I bought it from, and they graciously and easily arranged for an exchange for what I needed. Secondly, not 15-20 minutes after realizing I had the wrong adapter, I messed around and broke the connection that attaches the hard drive ribbon cable to the iPod's logic board. More specifically, I accidentally tore the dang thing off! That pretty much ruined the logic board, so that sent me on another online search for someone who sold replacements. That search led me to iRepair.com, which offered one at a fair price. Thirdly, after the new parts arrived... I got caught up in other things in life, I suppose. Then this past week, I got into some weird sleep patterns, causing me to find myself awake way earlier than I wanted to be. Since I was up and about by 7 a.m. yesterday with not much to do, I figured it would be a perfect time to see if this project was finally going to work...

Let's get it started
The actual job itself was about as straightforward as one could hope for, as long as you start out with the proper tools, which I fortunately did. Since messing around with logic boards was new to me, I looked for some help, which I found at iFixit, another helpful site for do-it-yourselfers. The job started with opening up the iPod (again) with my plastic "spudgers"; special tools that allow you to open the case without scratching or otherwise damaging it. They usually come in a pack if you purchase a new iPod battery, which I was replacing as well, since I had the thing opened up anyway.

Opened up, minus the battery
Once opened, the Torx T6 screwdriver was all that was needed to remove the old logic board. Screws removed, I then had to remove two ribbon cables from the logic board - one connected to the iPod display, the other to the click wheel. There's actually a third, the one that would be connected to the old hard drive that I previously mentioned. But since that was the connector that I ruined, the cable was already out. I always try to learn from my mistakes, so this time I was VERY careful with the other connectors, haha.

Left to Right: iPod screen, top shell, old logic board
Installing the new logic board was a simple reversal of that process. From that point I installed the new battery, which simply consisted of plugging the connector into the logic board, and setting it in place. Next was attaching the CF adapter to the hard drive ribbon cable, then inserting the card into the adapter. That was pretty much it, other than closing up the iPod. Not much to it at all, except...

New battery, logic board and CF adapter installed
Since the CF card took up considerably less physical space than the hard drive, it sort of rattled and flapped around inside, when you shook it. To remedy that (and avoid any potential disconnections from vibration), I re-opened the iPod, cut out a small piece of cardboard to use as a cushion, taped it to the inside of the iPod's metal back cover, and closed it up once again. Sure enough, that did the trick. There's a noticeable difference in weight; the iPod definitely feels lighter in my hand without the hard drive in there.

CF card installed and cardboard in place
Once all re-assembled, I fired it up, and I got the initial Apple logo on the screen that told me that it was powering on, at least. Then my only concern was to see what it would do once I connected it to my Mac. Once connected, the computer recognized it right away, giving me a screen in iTunes, wanting to "set up" the iPod. A text field on the screen said "TRANSCEND" for the "name" of the iPod, which is the actually the brand name of the CF card inside.

Plugged in
I changed the name to "Scott's iPod" - obvious, but works for me.  Anyway, once I clicked "Done", I noticed oddly that it was reporting being formatted for Windows.  I can only guess that since most (if not all) media cards are formatted for use with Windows, that's what it chose for the iPod.  However, to avoid any potential conflicts in syncing with my Mac, I decided to "restore" the iPod, and see if that fixed the formatting. I did so, and the computer instructed me to disconnect the iPod and connect it to an external power charger to complete the process. Connected to the charger, the screen showed the Apple logo once again, along with some weird progress bar at the bottom. Once it was done "progressing", I re-connected it to the Mac, and the format showed up as "Macintosh", this time.

iPod set up & ready to go!
To test it out, I transferred over some Al Green music. Transfers were nice and speedy. Operation of the click wheel through the menus was fine as it was before, and music played just like it should. I haven't connected it to my car stereo yet, but I don't see any reason why it wouldn't work there as well.

Installing a flash-based memory card with no moving parts, this iPod should last me years and years to come. Battery life should be much improved as well, as it was never all that great when running on the original hard drive. I'm really glad that this worked out though, mainly because I'm attached to this particular model of iPod. Since it's an older model, it's perfect for use in my car. No more carrying around a boatload of CD's!

Besides, in the very near future who knows, one may not even be able to purchase an iPod that only plays music. I also own an iPod touch, which I like a lot. The extra features of this iOS-based iPod (wi-fi, e-mail, web, apps) make it very powerful and useful in many ways. But I suppose I'm "old-school" as well, being the kind of person that prefers simplicity in many cases. A great device that performs one task very well, suits me just fine. An iPod touch in the car would be definite overkill. With the iPod touch at home, and my newly resurrected 2006 iPod in the car, it seems I will once again have the best of both worlds.

Success...

Saturday, July 2, 2011

MAC OS X, AT 10

A Happy July to all... A relatively short post for the first of the month, mostly to try to keep the blog current. More posts to come soon...

I wanted to write a few words about Mac OS X, which celebrates its 10th anniversary this year. Quite a feat for any computer operating system, I'd say. Its introduction in 2001 was Apple's first step toward the future of operating systems. Prior to OS X, Apple's computers ran OS 9, which was essentially the same OS they had been working with since the first introduction of the Mac back in 1984. 17 years is a LONG time. Mac OS X was considerably different from its predecessor technically, and was poised to show what a modern OS could offer the end user.

My first experiences with the Mac (prior to OS X) was playing around with my sister's various Macs she owned during the 90's. Then in 2000 I purchased my own computer, a PC running Windows 98 SE. At first it was OK, but eventually problems with malware taking my web browser hostage, and other issues soured my overall experience with the Windows OS. In 2003, I took the plunge and purchased a Power Mac G4, for the dedicated purpose of running Pro Tools LE, a program for multi-track audio recording that I still use today. Even though this Mac was still running OS 9, I was pleasantly surprised by how everything ran smoothly, and how tasks were more closely integrated to make the overall experience better. Once I got additional funds, I bought another G4 (used, refurbished) in 2005, for general everyday use. This particular machine ran OS X 10.3, code named "Panther". After booting up the machine for the first time, I was hooked! At the time I was particularly impressed how the computer configured itself for connecting to the internet! Using Mac OS X and all its native applications was how I imagined using a computer should be. I knew from then on that I would stick with Macs for good, and I have done so up to now, 4 computers later...

That said, here's a neat, geeky little trip down memory lane.  Below is a link to screenshots of every major OS X release, from 10.0 Cheetah in 2001 to the upcoming release of 10.7 Lion.  Pretty cool to see all the changes that have taken place. Enjoy looking at all the "cats"....

Friday, June 10, 2011

Apple WWDC Announcements - iCloud and More.

Well, I've had roughly a week to absorb the general "message" given this past Monday, at the Apple WWDC (Worldwide Developer Conference) keynote presentation in San Francisco. The message that I got from it was that a significant change to personal computing is coming. It may not happen tomorrow or next week, but the change is on its way.

If you have an interest (as well as nearly 2 hours to kill), you can watch the entire keynote here. If not, I wouldn't blame you; they're probably not for everybody. I personally enjoy watching these keynotes, but they do tend to run rather long, and are probably a bit too geeky for those not generally into that sort of thing. To attempt to briefly sum up exactly what was discussed at the keynote, it was 3 upcoming technologies from Apple: Mac OS X "Lion", the new version of their Mac operating system; iOS 5, which runs on their mobile devices including the nearly ubiquitous iPhone and iPad; and their new internet-based service called iCloud.

After watching the webcast of the keynote, the standouts for me were particularly the presentations for Mac OS X "Lion" and iCloud. The iOS 5 presentation was fine, but to me it seemed mostly like it will be an update to simply address some sticking OS issues that users have had with iPhone almost from the beginning, when the first version was introduced in 2007. The one major change that I noticed about the upcoming iOS is that users will no longer be forced to sync data from a PC or Mac. You will be able to use your iOS device as your one and only... device. Finally, no computer needed! One major issue definitely addressed, there.

The new version of Mac OS X, code-named "Lion" (due sometime in July), will be bringing some fairly major changes to the general look and feel of the OS. Apple has made it no secret that many of the new features in the new version of the OS are directly inspired by their experiences developing their iOS, which runs on the iPhone, iPad, and iPod touch. Apparently their goal is to make the Mac simpler to use and navigate, much like their mobile devices. Finger gestures (familiar to iPhone & iPad users) to initiate commands, and easier access to and management of applications seem to be the emphasis with this new version of the Mac OS. Since OS X Lion is not out yet, we can only speculate at this point whether this shift in approach to the OS will be good or bad; for us users, and subsequently for Apple, as a business. Much of the features demonstrated seem pretty interesting to say the least, so I'm anxious to see how it plays out.

Which brings us to iCloud, Apple's new internet service, included as a component of the new iOS 5. Honestly I'm still trying to completely wrap my head around what they're trying to do with this, but I believe I get the general idea. iCloud offers storage and backup, as well as an easy way to sync all your devices. It's a way to have access to all your data, from any device you may have in your hands at any given time!

The way Steve Jobs explained it, Apple initiated a concept about 10 years ago, where the personal computer would be the "hub" where all of your digital media is stored; music, photos, video, etc. What they hope to do with iCloud is make the computer simply another one of those devices, just like your smartphone, tablet device, what have you. The hub (for most Mac users, Apple is hoping) will now be a data center (or "server farm") they have set up in North Carolina. What they will store there is most if not all of our digital media, especially media purchased from the iTunes store as well as their recently launched Mac App Store. At present, the type of data included for iCloud is mail, contacts, calendar info, iWorks documents, music, photos, apps, and books.

Apple seems to be going in a slightly different direction from Google and Amazon with their cloud computing offerings. The advantage of iCloud appears to be that all your data would be instantly accessible by any of your devices, new or current. The data does not remain in the cloud to be "streamed" to your devices. The data is automatically downloaded (or "pushed") to your devices. The amazing thing is that they will offer this service (mostly) for free.

My opinion is that if these new technologies catch on like Apple would obviously like them to, it's bound to make them an even more powerful entity in the tech industry than they already are. I'm sure there are many who have already found things about the announcement to complain about (mostly because it is Apple announcing it, haha), but the way I see it, Apple is one of the few tech companies out there who are actually creating fundamental changes to not only the technology itself, but in how we interact with it. As opposed to the approach of other companies, who wait to see what everyone else is doing before making a move. But back to Apple, it will most likely be an interesting 6 to 12 months, seeing the public's response to these intriguing new products and services.