Sunday, May 12, 2013

3 Songs, 3 DAW's, Part 1 - Logic Pro 9

I've finally completed the first entry of my "3 Songs, 3 DAW's" experiment. For those who don't care to read my ramblings below and simply want to hear the track, here it is...


Avid's Pro Tools was my introduction to computer-based recording, and has since been my recording platform of choice. It wasn't my introduction to digital recording in general, because I'd been using (and still own) an 8-track digital recorder called the Roland VS-880EX since 1999, then got my first Macintosh G4 in 2003 to run Pro Tools LE. As time went on, I would read about the intriguingly cool features of other DAW's on the market, and figured this project would be a good way to explore what other DAW's have to offer, and satisfy my curiosity.

I recorded and mixed the song above in Apple's Logic Pro. Much like Apple's computer hardware lines, many of their software titles are divided into "professional" and "consumer" categories. In the case of their audio software, Logic Pro is their "professional" DAW, the "consumer" level  program being their also-excellent Garageband, which comes installed with a new Mac computer purchase.

Logic's history actually goes back to the early 90's, originally developed by a company called Emagic, and then was purchased by Apple in 2002. Logic has been a Mac-only program for a while now, but before Apple bought Logic, it was available for both the Mac and Windows. Once Logic became an Apple product, they initially had two versions, Logic Pro and Logic Express, which is my first experience with the software, and I later upgraded to the Pro version. Apple have since discontinued Logic Express, and now carry on with Logic Pro and Garageband.

Overview of Logic Pro's Main Window.

Below are some observations on Logic Pro, describing some feature and workflow comparisons to Pro Tools, in no particular order:

Audio Region Editing - The most major learning curve for me was in this area. From a Pro Tools user's perspective, Logic Pro's editing tools seemed a bit foreign at first. However, with some of time and practice, it got easier. On the plus side for Logic, they have what's called a "Smart" time grid setting, allowing the user to easily and quickly select exactly what section of audio they want to edit with the mouse, depending on the zoom level they're using in the Edit window. It accurately "snaps" your highlighted selection to the grid for whole bars of audio, or way down to the super-detailed waveform transient level. Pro Tools' Edit window gives the user many of the same edit options, but the grid "snap level" has to be selected manually.

Composite (Comp) Track Editing - Here's an area where I feel that Logic Pro has the advantage. Their "Quick Swipe Comping" feature is well implemented, and probably my favorite feature. Very easy to audition sections of multiple takes by simply swiping the area of the region you want to hear, and clicking that area in a different take lane to hear an alternate version of that particular section - very intuitive. Pro Tools' version of that feature is not bad, but you have to click a "solo" button for each take lane you want to audition, then click another button to commit to the comp selections that you chose. These extra steps makes the process a bit "clunky" in comparison to Logic Pro. A minor gripe perhaps, but I see all those extra mouse clicks adding to the total time spent editing your tracks. Logic Pro also inserts crossfades automatically between your edit points to ensure a smooth transition between takes. Pro Tools requires you to insert the crossfades manually, though you can set it up to perform a "batch fade", which places fades between multiple audio regions.
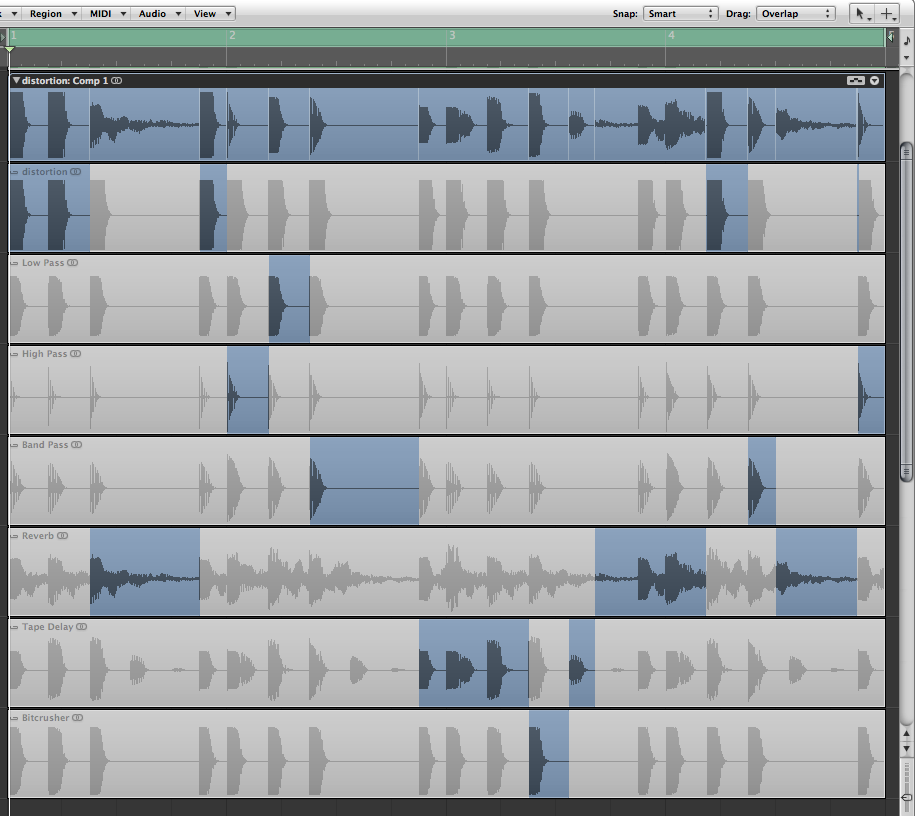
Quick Swipe Comping makes editing multiple takes a breeze.
Plugins - I've got to say that while I find Logic Pro's audio plugins to be high quality sound-wise, the user interface for many of the plugins controls is the thing I like least about the program. The interface designs on the virtual instruments in particular, range from slightly confusing to downright horrible! The UI's for the effects aren't much better. For that reason, it took me longer than expected to figure out how to get what I needed out of the plugins. Pro Tools plugin UI's are much more user friendly in my opinion, because they tend to resemble a piece of audio hardware, with familiar knobs and buttons on the screen. To its credit, Logic Pro does have some stock plugins that are very useful in mixing and mastering such as multi-band compression and stereo imaging, where in Pro Tools you may have to look to 3rd party plugins for certain things, which will probably require you to spend some extra money. Free plugins that are both compatible with Pro Tools as well as worth the trouble of searching out online are few and far between in my experience.

Logic Pro's Ultrabeat plugin UI - my pick for the worst ever.

Mix Automation - Much like the tools for audio editing, the mix automation tools took some time to get up to speed in Logic Pro. However, it has a very quick way to globally raise or lower all the automation points on a track at once, where it's a bit more involved to do in Pro Tools.

Track Bouncing - Logic Pro has the capability of "bouncing", or rendering, a mix of your project to an audio file "offline", which is faster than real-time. That means that a 4 minute piece of multi-track music would take less than a minute to bounce. Pro Tools versions 10 and prior can only bounce a mix in real time. Meaning whether it's a 30 second piece of music, or an hour long recording, whatever length of time your audio is, that's how long you must wait for it to render a stereo audio file you can burn to CD, import to your iPod, or post online. Offline bouncing is a great time-saver, and is why I give Logic Pro another advantage over Pro Tools. With as many mix versions as I tend to do, it was a nice consolation that I was able to render the mixes and have them ready to play in seconds. I've recently learned that Avid has finally incorporated an offline bounce feature in Pro Tools version 11, due out later this year. Logic Pro can also send the bounce of your mix to your iTunes library as well. Pro Tools didn't have this feature until their version 10 released last year, which I finally upgraded to (more on that in a future post).

CPU Usage - Logic Pro again has an advantage here (for now). You can pile on the virtual instruments and effect plugins and your computer will (usually) not break a sweat. My understanding is that Logic intelligently applies CPU power to your tracks only when audio is actually playing through it, and doesn't when it's not. This is not the case with Pro Tools. The faster your computer is, the better off you will be, but you sometimes have to be careful with your plugin usage with Pro Tools, or you start getting CPU error messages. My understanding, again, is that the upcoming Pro Tools 11 has an all-new audio engine that intelligently distributes CPU power similar to how Logic does.

Media Browser - Integrated into Logic Pro's main window where you can easily navigate through your computer's hard drive to locate files to bring into your currently running project. A nice touch that makes it feel like Logic is tightly integrated with your Mac's entire system. On the other hand, Pro Tools' "Workspace" browser window does the job I suppose, but it's another feature I'd describe as "clunky", and I've never been a big fan of it. Again, advantage, Logic Pro. 

All said and done, once I got over the learning curves, I found Logic Pro to be a versatile, very powerful and capable DAW. My minor gripes aside, you get many awesome features all in one program, features I'm sure I've only scratched the surface of. And with its price of $199 in the Mac App Store, it's the best DAW deal on the market for Mac users that I'm aware of. Many DAW's with comparable features are easily twice the price. In comparison between Logic Pro and Pro Tools, each program has its strengths and weaknesses, which is the real the point of this post. It's about one's own personal preferences. My preference? As much as I've learned using Logic Pro for the past several months and appreciate its strengths, I've got to say that I miss working in Pro Tools. It's the platform I've used most consistently over the past 10 years, and it's the workflow that I know best. However it doesn't mean that I couldn't or wouldn't go back and re-visit Logic from time to time, take advantage of its unique features, and bring my work back into Pro Tools. When necessary, moving project data (the audio track files) from one program to another is actually pretty easy to do.

Logic Pro is currently on version 9 and has been since 2009, an eternity in the computer and software business. Many among the community of Logic users feel "neglected", and say that Apple is long overdue for a new version. I must say that I agree. Far too busy manufacturing iPhones and iPads these days, perhaps? That said, a rumor of a new version has been in the air for a while now. Although I still consider myself a Pro Tools guy first and foremost, I will be looking with interest to see what Apple comes up with for Logic Pro version 10.

One down, two to go for this series. I haven't started recording anything yet, so I've got quite a bit of work ahead of me. I've also got some additional things to talk about, regarding the whole process of recording and mixing this song that I felt should be its own separate post, coming very soon.

Wednesday, February 20, 2013

An Update and A New Friend.

OK, first post of 2013, the first in about 7 months...!?!? NOT good, but I guess that's Life. 

But I am happy to say that the time has not been entirely unproductive. Took a trip up to Portland, Oregon last August to visit a friend, which was a nice getaway for a few days. On the music side of town, I discovered a new artist named Lianne La Havas (via these Youtube videos, here and here, not to mention here), who I think is an awesome, young talent. The first new artist I've been genuinely excited about in a LONG time. I got to see her perform twice here in L.A. since my discovery last September - a solo gig at the Hollywood Amoeba Records, then again with her band, at the Roxy in November. I was not disappointed at either show - she's already a pretty seasoned performer at such a young age. I can see why - she's been performing, touring and promoting the heck out of her debut album, and hasn't stopped yet. I just caught her on Jay Leno recently, not to mention she just released two more music videos.  Whew...

In between those two shows, I also got to see a rare performance by Chocolate Genius Incorporated, a band/project led by songwriter Mark Anthony Thompson. Been following his music since the first album in 1998, and was glad to be able to finally see him perform live.

Apparently, musical talent runs in his family... His youngest daughter Zsela (17 years old as of last year...?) has an EP of songs called "All of the Above", which I think is also great. He produced the tracks, BTW, pretty evident if you're familiar with his work. Anyway, the songs are available for free streaming on her Bandcamp page, with an option to purchase the songs for a $5.00 (or more) donation. Very cool - I certainly hope she does more music in the future.

But enough about them, this blog is supposed to be about ME, haha... Briefly, I haven't forgotten about or abandoned my intentions laid out in the last post - to produce 3 tracks using a different DAW program for each one. I really have no excuse why they are taking so long, other than that excuse called LIFE... Art all too often plays second fiddle to Life in my world, sad to say. The good news is that the first track is in the mixing stage right now. With any luck, fingers crossed, I should have a mix to post here very soon.

But in the meantime, Here are some pics of a new friend I've acquired as of last weekend. I've sort of been jonesing for a new acoustic guitar for well over a year now. I do have an acoustic that I purchased back in 1994 (19 years ago!), and it's actually still playable, in great shape and sounds pretty good, especially now that the wood has matured some. But I suppose I wanted to take a look at what else is out there, and explore other tonal options. More specifically, I'd been looking for an acoustic with a slightly smaller body, which usually makes for a guitar lower in overall volume, which would help me because my singing voice is naturally pretty low in volume in comparison to the guitar I've been playing; it drowns my voice out in many cases. A smaller scale guitar is also naturally easier to hold and handle. Standard acoustic guitar bodies can be thick and a little unwieldy. This one feels closer to an electric guitar, lightweight and comfortable to play.

At first I purchased a guitar online, made by a manufacturer called Wechter. I was really happy with it, except that it had improperly installed frets (the small metal pieces installed on top of the neck that determine what notes to play). Several frets were not flush to the neck, and looked like they might work themselves loose with time...! After I reported the problem to the store and shipped it back, they determined that it wouldn't be worth trying to repair, and wouldn't be getting more in stock anytime soon. To me that really meant that they were not willing to pay for that level of repair - I'm pretty sure the frets could be fixed, but it probably wouldn't have been cheap. So, in the end I got a refund. A real shame that guitar didn't work out.

A few weeks later, I came across the guitar I eventually settled on, the M-120, made by Guild. The body is about 7/8 the scale of a standard acoustic guitar's body, but the neck is standard scale, but thin, for easy playability. The body is solid mahogany, top, back and sides, reputed to be a "warm" sounding tonewood, as opposed to "bright". As you can hopefully tell from the pics, the wood is a nice warm reddish-brown color. The neck is made of mahogany as well, with a fingerboard made of rosewood. No fancy ornamentation like on other (more expensive) guitars, but it does the job it's made to do.


Front...
...and back.
A nice additional feature is the electric pickup system installed with volume and tone controls inside the soundhole, so I can plug it into an amplifier or recorder just like an electric guitar, if I so choose. I see that coming in handy if I want to quickly lay down a track for a rough idea, and I'm too lazy or impatient to set up a mic, haha.

Guitar cable connects to an amp or mixer right here. It simultaneously serves as the guitar's rear strap button.

Tone-wise, I must admit the Wechter sounded a little "sweeter", but it's not a brand that's sold all over the place like Fender or Gibson, so their guitars are unfortunately harder to find. But this Guild is no slouch either. After some preliminary miking tests, I believe I will get some pretty nice sounding tracks recorded with this guitar, with less volume to potentially disturb the neighbors with in my building. The neck shape feels really good in my hand, and the frets are just fine, haha. It also came with a hard shell case, a nice plus. This Youtube video was a major factor in my decision to check it out.


Close-up of the body's wood grain.

Inside the case...

So, that's my journey in finding the new addition to my instrument family. I've hardly put it down since bringing it home, so I'd say that's a good sign. Looking forward to many, many hours of enjoyment with my new pal. The only thing is I have yet to come up with a name for it...! Silly as it may sound to some, I've named pretty much all my guitars and basses. Any suggestions? If not, I guess I'll wait until a name comes to me.

All for now... I will do my darnedest next time to not take so long between posts, for those actually still coming here to visit.  If so, then thanks...!

Saturday, July 28, 2012

3 Songs, 3 DAW's... Coming Soon.

Hello, thanks for stopping by for a visit. It's been a while for me as well, so I thought I'd stop by myself, and post an update.

A few weeks ago, I decided to get back on the recording "horse" as it were, and get to ridin' once again. I've got more songs that I'd like to demo, as well as some pieces that are mostly basic instrumental ideas at this point. I figure, once those are recorded, I can decide whether they will remain instrumental pieces, or try to add some lyric and melody to them.

However, this time around I decided to put a spin on recording this new batch of 3 songs. Being that this blog is called "the harvard experiments", I came up with what I think might be an interesting one: to record 3 songs, using a different Digital Audio Workstation (DAW, for short) program for each one.

What's the purpose of using 3 separate programs for each song, you might ask?  Well, DAW's are available from many different companies these days. While the task of recording and mixing digital audio is usually the end goal, many programs have their strengths in certain areas; their own unique spin on certain features, some of which could drastically improve the user's workflow for what they are trying to do with their project.

The 3 DAW's I am using for this project will be: Avid's Pro Tools LE 8. This is the software I used to record the 3 songs I posted earlier this year, and the one I'm most familiar with, as far as getting tasks done fairly quickly. I've been using Pro Tools since 2003, and while I don't consider myself a true Pro Tools "master", I do feel like I know what I'm doing when I work with it, more so than with any other audio program. Pro Tools is actually up to version 10 now, but I've decided not to upgrade, although I'd like to. I may get into that more in depth in a future post...
Screenshot of Pro Tools version 10 - not the one I'm using, but similar.
Second, I'll be using Apple's Logic Pro 9. I started using a previous version of Logic back in 2008 or so, and since I liked many aspects of the software, I upgraded to Logic Pro in December 2011. As I mentioned earlier, Logic has a different approach to certain workflows in comparison to Pro Tools, some of which I find that I prefer. I think because of the fact that it is from Apple, Logic Pro seems to be more integrated with the Mac OS in certain ways to give the user more of a seamless experience, and I do appreciate that. I'm anxious to get more experienced using it, and hopefully take advantage of its strengths.

Logic Pro 9
The third program I'll be using will be Reason 6.5, by Propellerhead Software. This is the one I'm most excited to work with because, although I've been a Reason user since version 2.0 (as long as I've been using Pro Tools), the current version is the first that includes audio recording and editing, which now officially makes Reason a DAW in its own right. For those that don't know, previous versions of Reason included samplers, drum machines, synthesizers, effects, and a MIDI sequencer to build your own musical masterpieces. However, you could not record your own vocal or "live" instrument tracks into it. You would have to export the sounds from Reason into another program, where you'd mix those together with your "live" tracks - that is, until now. Reason 6 now has audio recording and editing, a full-featured virtual mixing console with EQ, dynamics, and other new effects to play with, so you could potentially buy Reason and an audio interface, and you'd have everything you need to put together some awesome tracks. But I'm reserving final judgement once the track is completed...


Some may feel that it's counter-productive to try to record music with software that you're not very familiar with. There's also a group of folks that like to learn one thing, and stick with it to the death! A friend of mine probably falls into that category. If I offer, or even mention, a new piece of software to him, he is NOT interested, haha. I believe his way of thinking is along the lines of the old adage, "if it ain't broke, don't fix it", which certainly does work for him - he produces some excellent tracks with the same software and equipment he's been on for years. I do admit there can be a learning curve with a new piece of software or other gear, which can slow down your productivity while trying to figure every thing out. I suppose the "newness" and the discovery period excites me as much as the end result of the project I'm working towards. I guess I get bored easily, at times. In other words, the tools interest me as much as what they can produce. If I see that some new software has a killer feature that expands my possibilities or could enhance my workflow... If I have the means to do so, I've GOT to check it out! However, I DO want to get some actual tracks done at SOME point, so that is why I've restricted myself to only 3 programs, haha.

So, that's my current recording project: To use a different DAW on each song, and discover what I like and don't like about working with each one. I'll also compare which song I feel came out the best, in comparison to which program was used. Naturally, I'll be sharing my results and thoughts in future posts. I've started recording some basic tracks a couple weeks ago, so yes, the project is definitely under way. Till next time...

Tuesday, May 29, 2012

Streaming Music With My Old Airport Express

A "bonus" post of sorts for this month... Painfully obvious from my recent posts, I’ve been doing a lot of work on my guitars lately. I'm having a blast, but it’s time consuming work. I find that playing some music helps keep things moving along.

Until recently I had been using my iPod for that purpose, because I’m working at my studio workstation desk where my laptop resides. Running iTunes software, computers (along with my iPod) have been my main source of music for years now, effectively replacing all my CD players. The laptop is usually connected to my studio speakers via a special "Y" cable, with an 1/8" stereo mini-plug on one end that goes into the laptop's headphone jack, and the other end splits into separate Right and Left 1/4" plugs that go to the speakers. So when I’m working on my guitars, I have to move the laptop off the desk, and usually onto my bed, nearby. That audio cord I use is way too short to reach from the speakers to the bed - about 3 feet, and I haven't been able to locate longer ones of this type. I could certainly play music from my iTunes on the laptop via the laptop's built-in speakers, which I tried at first. The sound is loud and clear, but a bit wimpy - I need some BASS in the music I listen to! Using the iPod is fine, but having those dang earbuds in my ears for hours on end is rough on my ears, so that’s not ideal either.

I came up with an idea: I remembered that I still have an older Apple Airport Express Wifi base station, bought years ago when 802.11g was the fastest WiFi standard available to most consumers. I replaced it just last year by its big brother, the Airport Extreme, which has the current 802.11n standard and other features that the Express doesn't have. So until now, the Express had been just sitting, collecting dust. However, the Express is unique from the Extreme in that it has an 1/8" stereo audio out jack that you can connect to a pair of speakers, and wirelessly stream your iTunes audio out to those speakers from anywhere in your home. This feature was originally called "AirTunes" when it was available only on the Express. In recent years, Apple came up with AirPlay, which includes streaming audio from iOS devices to computers and Apple TV, and eventually they changed the name for the Express' streaming feature to unify it all together and, I suppose, to make things less confusing.

After plugging in the Airport Express to power, I went to the laptop, and launched the "Airport Utility" program to configure the Express to join my current WiFi network as an AirTunes device. During this setup, you can give your AirTunes speakers a name of your choosing for easy recognition. Then I went to the AirPlay icon button in the lower right corner of my iTunes window, where you configure which speakers you want the iTunes audio to stream to. Once configured, it worked great, no issues whatsoever. I can now have my laptop sitting anywhere in my apartment and stream iTunes into the bedroom connected this way. Yes, the distance from the speakers to the bed is only about 4 or 5 feet, but if you don't have an audio cable that length to connect your laptop and speakers, this comes right in handy. You also have the option to stream iTunes audio out to multiple speakers at once - very cool!

One thing I noticed after configuring the Airport Express to join my WiFi network is that, because the device uses the older and slower 802.11g, it slows down any other devices on the network to that standard, such as my 802.11n Airport Extreme I now use for Internet access. I noticed that web pages (especially with video) load noticeably slower at "g" speeds. The problem could be solved by buying an updated Express that runs on "n", but I wouldn't bother for this type of occasional use. I see myself only using it while I'm working on guitars, or some other situation where I'd need the laptop to be out of the way, and I wouldn't have need for much web browsing then, anyway. I can simply plug in the Express when I want to stream from iTunes, and unplug it when I don't need it, returning to full network bandwidth again with the Extreme. A nice feature, and a good way to put "retired" equipment back to work...

Selecting the AirPlay speakers, labeled "Bedroom".
Airport Express (white box), with an audio cable (orange & grey plugs) connected to my speakers. My laptop - off to the left about 4 or 5 feet away, untethered.

Monday, May 28, 2012

Project #2 - Pickup Replacement, Hamer "XT"

For this post I'll be recounting my recent pickup replacement job for my 2-humbucker guitar, made by Hamer, a manufacturer that's been around for almost 40 years. Or, at least it was around - according to Wikipedia, they were recently bought out by Fender, and Hamer's U.S. production guitars have been discontinued. Not sure what this guitar model is actually called, but the headstock says "XT Series", which was their "budget" line of guitars, built in China. I bought it 3 or 4 years ago at Sam Ash sort of on a whim, because it was so inexpensive. I believe the price tag said $249, which itself was a great price, but lucky me, I'd caught it on sale, so I ended up paying what I recall was $179! I wasn't at the store to buy a guitar that day, but since it was so reasonably priced I figured, "why not?"

Hamer "XT" Series Guitar.

These pickups gotta go...

The first thing about this guitar that caught my attention was the translucent black "burst"-type finish, over what appears to be a flame maple top. For a "budget" guitar, this thing looks GREAT. To my eyes, hanging on the wall in the store, it looked like a fairly expensive guitar. After seeing the price tag, I had to at least plug it into an amp and check out how it played.

I remember being particularly impressed by the all-around construction for a guitar at this low price range. The neck feels different than a standard Fender neck; a bit thicker, but still very comfortable in my hand. The action was smooth, and the frets were surprisingly finished quite well. The tuning machines and other hardware were pretty solid, no loose parts at all, as you may occasionally find on the cheaper guitars.

This guitar was just right for me, because I'd been looking for an affordable "Gibson-style" guitar as an alternative to my Fender guitars that I usually play. While I'd love to have a genuine Les Paul or ES-335, they are awfully pricey, more so than even most of Fender's American-made guitars, due to Gibson's fancier designs, overall. I still wrestle with that dilemma; should I or should I not slap down that much money for a Gibson? In the meantime, I'll have fun with my Hamer...

I bought the guitar knowing that the weak link in cheaper electric guitars tends to be the electronics: the switches, the potentiometers, the pickups. When I tested it out in the store, it sounded OK, if not mind-blowing. Again, because of the price, the fact that it felt great to play, and the overall construction of the guitar was very good, I didn't have a huge problem with it not sounding so great. I figured if the pickups or other electronic parts need replacing later on, I can do that myself.

Once I got it home and played it through my amp for a week or so, away from all the racket that goes on in the music stores, I confirmed that better pickups were definitely in this guitar's future. Months after that, I noticed that the bridge pickup really didn't sound very good at all, and buzzed LOUDLY, especially when I touched the metal pickup cover with my fingers. Hard to avoid, because that's exactly what my strumming/picking hand does when it rests against the guitar while playing. That told me there was something funky going on with the wiring, or possibly the pickup itself. The neck, or "rhythm" pickup played with no problems, but the overall sound to my ears was basically "so-so". Not horrible, but not great either. I felt that this guitar could sound much better if I replaced the pickups. Admittedly, the time elapsed between my decision to replace the pickups and actually getting down to doing the job was pretty long! After the bridge pickup started acting up on me, the guitar basically sat in my closet for a long while, until I made time to work on it. Once I started working on my other guitars again, this was the perfect time to get this particular job done, too.

I'd been buying guitar repair supplies and tools from StewMac recently, and they happen to also sell an affordably priced pickup line called Golden Age. They make pickups for both Fender-style and Gibson-style guitars. Since my Hamer was a budget-priced guitar to begin with, I figured I'd give these pickups a try. Most of their pickups are priced at just over half of what one would pay for the more well-known pickup brands, such as Seymour Duncan and Dimarzio. Golden Age seems to focus on reproductions of traditional, classic pickup designs, and have a lot of positive reviews on the StewMac site. Many have opined that they sound excellent for the price, so I felt pretty confident going with them.

Golden Age pickups - "Vintage vibe" at a decent price.

As I said, the Hamer has a 2-humbucker pickup configuration, with 2 volume potentiometers ("pots" for short, 1 per pickup), 1 master tone pot, and a 3-way switch. When I opened up the control panel on the back of the guitar, I found some wiring that was a bit different than what I've seen before. Instead of soldering the pickups' lead wires directly to the volume pots, they had these white plastic connectors, going to this extra wire that was then soldered to the pots. The picture below gives you a better idea of what I'm talking about, since I don't know exactly know what they're called...

Upon closer inspection, I saw that one of the wires from the plastic connectors was very loose, and the more I fiddled with it, it eventually just fell out altogether. There was some kind of small metal thing crimped to the end of the wire, which made the electrical contact with the other side of the connector. Tracing the wire path led me to the ground wire of the bridge pickup - the same one I was having trouble with. Aha! The ground wire's bad connection was the cause of the buzzing when I touched the pickup. I can only assume the factory used those things to wire the guitar to save time in swapping out those cheapo pickups in the event that one failed. So I decided to get rid of those plastic connector things, and just wire up everything the conventional way, which wasn't too much hassle, being that I was expecting to do that anyway. I could even use the same wire that was already there, so no parts or supplies were really needed to do this job, other than the new pickups, of course.

The control cavity. The white plastic connectors in the wiring are not normally used in guitar electronics...
...and here's the reason why - a bad connection.

The pickup replacement was pretty straightforward. Once I got the old pickups out of there, I installed the new pickups into the plastic cream-colored mounting rings using the height adjustment screws and springs. This is usually the tricky part, because it's all too easy to slip and lose hold of a spring as you try to compress it over the screw that mounts into the pickup, and then *BOING*, the spring goes flying and disappears into the Land of Lost Stuff...! I've struggled with non-"behaving" pickup height springs many times in the past. The folks at StewMac have a clever solution for that as well - the Humbucker Helpers. These are stainless steel clips that temporarily hold the whole assembly of the mounting ring, the pickup, 2 screws, and the springs all together until you have the screws securely mounted into the pickup, with springs attached. Then simply pull the clip away, and everything stays put as you need it to. Very cool! The page link shows pictures of them in use - I forgot to take one myself with them on.

Doing things the hard way - removing the old pickups with strings still on.

New Golden Age pickups ready to go. Mounting rings and height adjustment screws installed with the assistance of the "Humbucker Helpers".

Next was to get each assembly into their respective pickup cavities. Not too challenging, except that I went ahead with attempting this installation without removing the strings, as I didn't have a new set of strings to install at the time. It wasn't too difficult - I just had to take extra care not to scratch the guitar's finish while squeezing the pickups underneath the loose strings, and into the cavities. Happy to say that it worked out without incident.

On this guitar, there is a small channel routed into the body of the guitar where you thread the lead wires of the neck pickup (the top one) through, then into the control cavity in the back, where the wires would be soldered to the volume pots. Since the control cavity is fairly tight, I needed to undo the mounting nuts and lift the pots out of the guitar. To give the pots some stability while I'm soldering, I used a small piece of cardboard with holes poked into them, and inserted the shaft of the pots into the holes. That way, I had better access to the connections I needed to get at with my soldering iron. I also used a small cloth to prevent the pots from scratching the back of the guitar body while I'm working.

Removing the volume pots.

Threading the pickup leads thru the channel, to the control cavity.
Soldering the leads to the volume pots, with cardboard as support.

With everything soldered, I installed each pot back where they belonged, and used some masking tape to gather up the longer lengths of wire and make it somewhat neater inside the cavity. The tape replaced the plastic ties they had on the wires before I started. Fortunately I didn't have to make any solder connections to the pickup selector switch, so at that point the job was done, save for screwing the cover back onto the control cavity. Upon first testing, I did have a weird situation where the sound of one of the pickups was cutting out intermittently. After opening everything up again, I inspected the solder joints I just made, which looked fine to me; I didn't see a need to re-do them. I then shrugged, re-installed the pots in the cavity, closed it up, plugged in again, and this time there were no problems with the pickups. Perhaps a wire was shorting out against something inside? I'm still not sure what happened there, but all works fine now; I haven't had any problems with the sound cutting out after re-sitting everything into place.

Pots back in the guitar, with wires taped up neatly.

Everything re-assembled. Success!

I definitely hear a much improved sound on this guitar with the new pickups. They have a smooth, clean sound. I can also coax out warmer, jazzy/bluesy tones as well, especially if I roll down the tone knob a bit. All my testing is done through a small Fender solid-state "Bronco" practice amp, on mostly clean settings - the "distorted" sounds for this little amp are fairly useless (meaning bad). I still need to check it out playing through my somewhat larger Fender "Blues Jr." amp, trying some dirtier, more "authentic" tube tones. That said, I'm happy with how it sounds now, finally.

All the problems with buzzing and noise are gone. This is one quiet guitar - hands down the quietest one I own now, even with all the sheilding work I've done on my Fenders. After all the "wrestling" I've done over the years with the buzzing and humming of my single-coil guitars, this is like a breath of fresh air! I'm looking forward to recording with this guitar in the future.

As I mentioned in the last post, since I'm quite satisfied with these Golden Age pickups, I plan on also getting a single-coil set to install in my Fender Strat. When that happens, I'll definitely write up a post about installing those pickups as well.  Until next time...

Saturday, May 12, 2012

Project #1 - Reviving My Fender Stratocaster

I'm back once again... Looking at the blog, it's been quite a while since I've posted. My last post was in January, and here we are, already in May! Weird, how time flies... I should have more stuff to post in the coming weeks or months. I'm on a sort of hiatus from recording at the moment, so I decided to work on my guitar projects in the meantime. I currently have 3 electric guitars and 2 bass guitars, and they all need work of some sort or another. Generally speaking, the older the instrument is, the more work is needed to be done on them.

I didn't plan to start working on them now, but after doing the work on my brother's bass guitar recently (basically re-wiring the whole thing), I suppose I got the bug to work on my own instruments again. The wiring job on my brother's bass was pretty challenging for my current level of expertise. However, I did gain some good practical knowledge and experience from the job, and will now have a much better idea of what I'm doing when I work on my own guitars. Unfortunately, I didn't think to take pictures of the bass job...

1994 Fender Stratocaster
The first guitar I decided to work on was the one that's been neglected the longest, my black Fender Stratocaster. This is a "made-in-Mexico" model (which Fender calls the "Standard" Stratocaster) that I bought back in 1994; the first brand-new guitar I ever purchased. In fact, it was the only electric guitar that I owned for many years. Once I got my "American Standard" Fender Telecaster in 2007, the Strat was more or less put on retirement status. But I've been missing my old Strat lately, so I felt it was time to start getting it back into playing shape again. Looking at it now, I see all the years of playing and general knocking around through the various nicks, dents and scratches. The frets are especially worn; practically ground down to nubs, with deep vertical grooves in them from the friction against the strings; they're supposed to be smooth from end to end. I definitely played the heck out of this guitar! Eventually I plan to take it to a professional to get new frets installed. In its current shape, it's never going to be 100% playable. With the worn-out frets, it's too difficult to play certain chords without fret buzzing.

These frets are shot.
For now, the focus will be on what jobs I can do myself, which is install copper foil shielding tape in the pickup cavity of the guitar body to help reduce hum and noise, which I learned all about last year with the Tele. I also re-installed the original single-coil pickup in the bridge position. It was replaced with a Seymour Duncan JB humbucker many years ago. I changed out the pickup to have access to more of a "Rock" sound, while keeping the brighter, cleaner-sounding single-coils in the middle and neck positions, since I only had one electric guitar at the time. That was the only real modification done on this guitar - everything else is basically stock as I purchased it.

My pickup installation "hack" job, done years ago.
This time around, the shielding work on the Strat went way smoother than with the Tele. It's still time-consuming work, but I at least had more of a clue on how to go about it. The best part was that I didn't slice open any of my fingers with the copper foil tape like last time...

Pickup and control cavity, before copper foil tape application...

...and after.
Once the shielding was done, it was on to de-soldering the humbucker pickup and re-installing the single-coil, as well as wiring up a new volume potentiometer (tech name for the "knob"). The old one still works, but it's worn, with audible static-y sounds coming through the amp when you turn the volume knob. They have electronics contact cleaners available that would fix that, but I've never purchased any as of yet. Besides, new pots are fairly cheap. I've found they cost no more than between $5 and $8 a piece. In many cases, less than that, depending on the brand and where you purchase. Plus, I like to practice to improve my soldering technique. I first learned how to solder way back in junior high school, but apparently my technique had been sorely lacking! Thanks to DVDs and YouTube videos, I've recently learned how to correctly solder guitar electronics just in the past few weeks. I'm not sure I'd call my techniques "correct" just yet, but they have definitely improved.

Pickguard turned over to show pickup & control wiring
To insure I wouldn't screw something up, I downloaded a wiring diagram from Seymour Duncan's website. Their free wiring diagram page has PDF files of just about every conceivable pickup configuration - a great resource! There are other free sources of wiring diagrams online, but I find Seymour Duncan's the easiest to read and understand. With my diagram and my trusty tools in hand, this procedure also went pretty smoothly. Oh, and because the pickguard has a large hole cut out to allow the larger humbucker pickup to fit, installing the original pickups and controls into a new pickguard was also part of this job.  When I was installing the humbucker way back then, I wonder why I didn't just buy a new pickguard, instead of "hacking" a larger hole into the original? Youthful impatience? Didn't want to spend the extra money? Who knows? That was nearly 20 years ago...!

Electronics transferred to the new pickguard (note aluminum shielding foil).
The end result, back to its original look (and sound).

Once the job was finished, I installed new strings on the guitar, and everything worked fine. My only gripe is that I'm not getting the amount of reduction in hum and noise that I thought I would with the shielding tape job done; pretty much the same result as when I did the same job on the Tele. Is there something I'm missing? I recently read some articles online about other ways to shield your guitar from electrical interference, including wiring shielded single conductor wire on the output jack, which I did on my brother's bass, and it seemed to help reduce noise quite a bit (in addition to shielding the pickup cavity on his bass as well). So perhaps that's the "missing link". I didn't re-wire the output jack on the Strat, but I plan to as soon as I buy more of that type of wire, and see if that helps reduce more of the hum.

Another shielding technique I read about is to wrap a length of copper foil tape around the actual pickup coils, then solder a ground wire from the tape to the bottom bobbin of the pickup (where the main pickup coil wire is attached). I'm not sure I want to get into that level of soldering, because I read that it's delicate work where you can easily ruin the pickup if you mess up. What I'm thinking of doing instead is buying a new set of Golden Age Strat pickups I've been reading about, from StewMac. They are modestly priced compared to other brands, and they come pre-installed with the shielding I just mentioned. I recently bought a pair of Golden Age humbucker pickups for another guitar of mine, and plan to install those very soon. That will be the subject of my next post. If those pickups are to my liking, I'll most likely go ahead and buy the Strat pickups too. More stuff coming soon...

FYI, it is not at all my intention for this post to be one big ad for StewMac. I certainly don't work for them (haha), but I personally believe them to be a good source for useful (and free) information, as well as buying parts and supplies you need. I figure if you can find everything you need in one place, why not take advantage? But that certainly doesn't mean you can't shop around, which I do as well. Just thought I'd put that out there.

Some helpful articles on guitar electronics:

http://www.stewmac.com/tradesecrets/promo/ts0052_shielding

http://www.guitarnuts.com/wiring/menu.php (Good info on this site, but it seems to be an older-type site, loaded with annoying pop-up windows when you click page links. You have been warned...)

Sunday, January 22, 2012

Finally.

Happy 2012 to everyone... It sure has been a while since I've posted last, but I certainly have something of interest to share today...

After many months of ups & downs, technical issues, setbacks, do-overs and everything else you can think of, I finally have some music to share with you. I have joined Soundcloud to post my music online. There are currently 3 tracks posted, and more in the works. For those who have been waiting - thanks for your patience. Hope you enjoy...

Demos - 2012 by harvard_exp